<?xml version="1.0" encoding="utf-8"?><feed xmlns="http://www.w3.org/2005/Atom" ><generator uri="https://jekyllrb.com/" version="3.10.0">Jekyll</generator><link href="https://hannahhafner.github.io/feed.xml" rel="self" type="application/atom+xml" /><link href="https://hannahhafner.github.io/" rel="alternate" type="text/html" /><updated>2026-06-16T21:53:30+00:00</updated><id>https://hannahhafner.github.io/feed.xml</id><title type="html">Hannah Hafner</title><subtitle>Hannah Hafner&apos;s academic portfolio</subtitle><author><name>Hannah W. Hafner</name></author><entry><title type="html">How to create an Academic Personal Website</title><link href="https://hannahhafner.github.io/posts/2026/06/website_tutorial/" rel="alternate" type="text/html" title="How to create an Academic Personal Website" /><published>2026-06-11T00:00:00+00:00</published><updated>2026-06-11T00:00:00+00:00</updated><id>https://hannahhafner.github.io/posts/2026/06/website_tutorial</id><content type="html" xml:base="https://hannahhafner.github.io/posts/2026/06/website_tutorial/"><![CDATA[<p>This website was created using GitHub Pages, which you can read more about <a href="https://docs.github.com/en/pages">in their documentation</a>. I based my website off this <a href="https://academicpages.github.io/">existing GitHub Pages template.</a> If you want to use a different template, you can find additional templates <a href="https://github.com/topics/portfolio-website">here,</a> or you can do your own research.</p>

<p>Using a pre-existing template is why you don’t need a background in web development to create your own academic portfolio!</p>

<p>For this tutorial, I am assuming that you have a basic understanding of GitHub (clone, commit, pull, push) and Markdown in order to create the the webpages on your website</p>

<p>If you don’t, I recommend checking out <a href="https://docs.github.com/en/get-started/start-your-journey/hello-world">this GitHub tutorial</a> and this <a href="https://www.markdownguide.org/basic-syntax/">basic Markdown syntax.</a> You can also check out this <a href="https://jayrobwilliams.com/posts/2020/06/academic-website/">detailed tutorial</a> on creating an Academic Pages website (assuming no prior knowledge in GitHub) created by Rob Williams.</p>

<p>On to the website tutorial!</p>
<h2 id="required-materials">Required Materials</h2>
<ol>
  <li>GitHub Account
    <ul>
      <li>If you don’t have a GitHub account, you can make one <a href="https://docs.github.com/en/get-started/start-your-journey/creating-an-account-on-github">here</a>.</li>
    </ul>
  </li>
  <li>A few hours!</li>
</ol>

<h2 id="step-1-fork-the-academic-pages-template">Step 1: Fork the Academic Pages Template</h2>
<p>In GitHub, a <strong>repository</strong> is a collection of files for a specific software project that can be updated and tracked as changes are made over time. <strong>Forking</strong> a repository means that you are creating a copy of an existing repository that another creator has made.</p>

<p>For my personal website, I am using this <a href="https://academicpages.github.io/">template</a> by Academic Pages for my website.</p>

<p>To fork the repository, first navigate to the <a href="https://github.com/academicpages/academicpages.github.io">source code for the template</a>. Next, click on the Fork button.</p>

<p><img src="/images/fork.png" alt="Button to Fork a repository" /></p>

<p>This will bring you to a new page where you can name your new forked repository. Make sure you name your repository <strong>&lt;your_github_username&gt;.github.io</strong> as this will be the URL for your website.</p>

<p>You should now have a new repository for your website!</p>

<h2 id="step-2-set-up-the-sidebar">Step 2: Set up the Sidebar</h2>
<p>In order to set up the left sidebar, which is present on all pages of the website, you will need to modify files in your repository.</p>

<p>To do this, I would recommend cloning the repository from GitHub onto your computer so you can make local changes and push those changes to GitHub. <strong>Cloning</strong> is where you create a copy of a repository locally on your computer. You can then modify files locally and push (or upload) those files to GitHub. See <a href="https://www.w3schools.com/git/git_clone.asp">here</a> if you want to learn more about cloning on GitHub.</p>

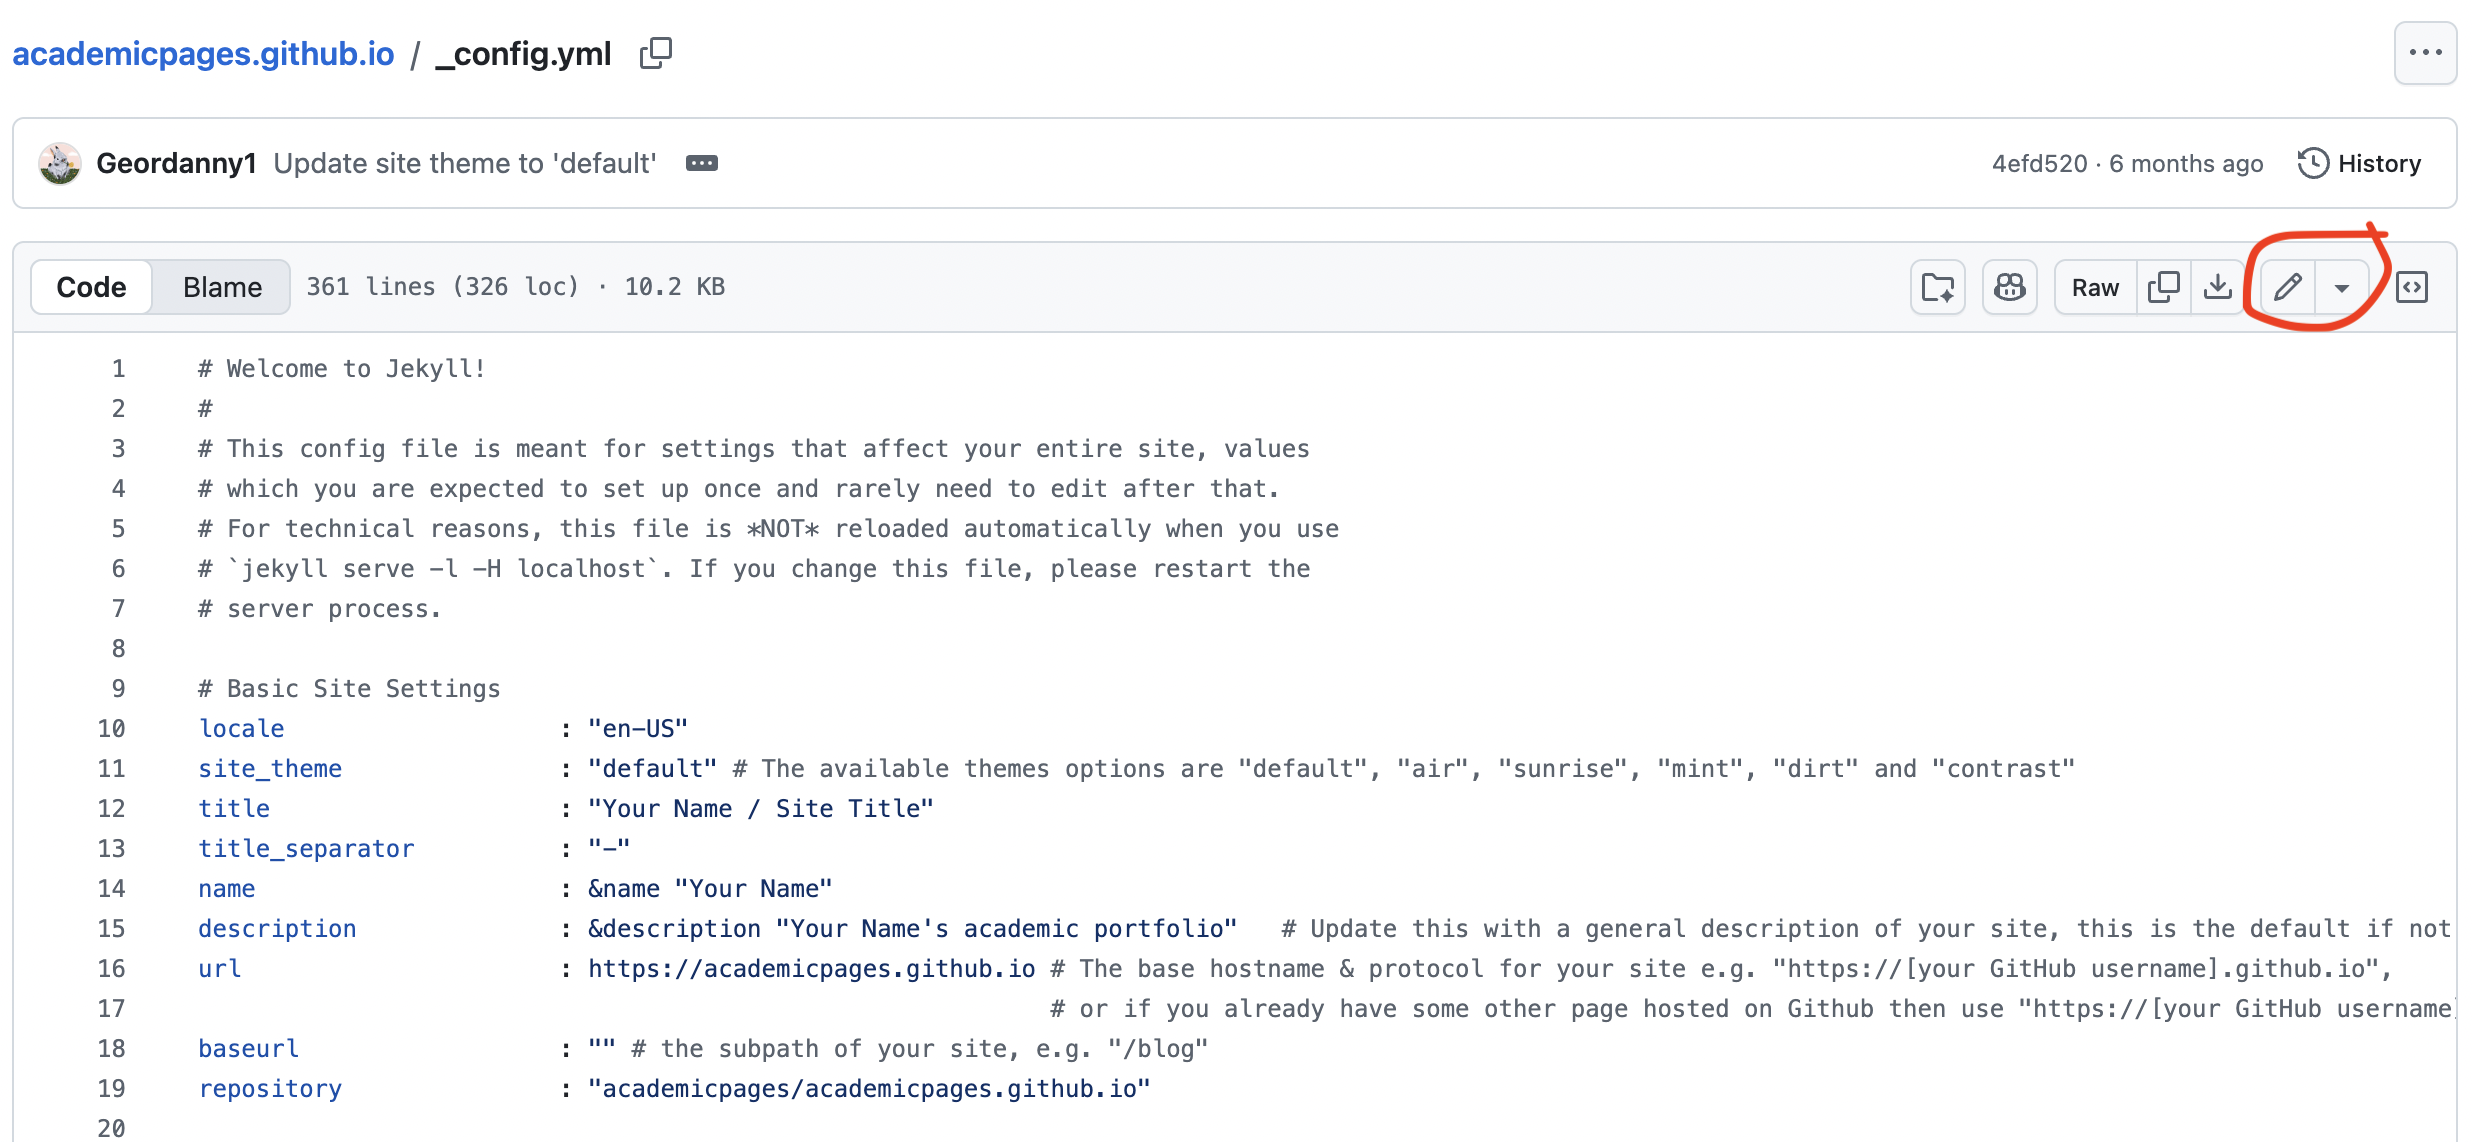
<p>If you don’t know how to clone a repository, you can modify files directly on the GitHub website for your repository. To do this, click a file you want to edit, click on the Pencil icon, modify the file as desired, and then clicking the green Commit button in order to push (or upload) those changes to the master branch.</p>

<p><img src="/images/edit.png" alt="Edit icon" /></p>

<p>In order to setup the sidebar for the website, you will need to edit the <code class="language-plaintext highlighter-rouge">_config.yml</code> file in the root directory of your repository.</p>

<h3 id="modify-basic-site-settings">Modify Basic Site Settings</h3>
<p>If you open the <code class="language-plaintext highlighter-rouge">_config.yml</code> file in your repository, under basic site settings, you should see these options from the Academic Pages template:</p>

<div class="language-yml highlighter-rouge"><div class="highlight"><pre class="highlight"><code><span class="c1"># Basic Site Settings</span>
<span class="na">locale                   </span><span class="pi">:</span> <span class="s2">"</span><span class="s">en-US"</span>
<span class="na">site_theme               </span><span class="pi">:</span> <span class="s2">"</span><span class="s">default"</span> <span class="c1"># The available themes options are "default", "air", "sunrise", "mint", "dirt" and "contrast"</span>
<span class="na">title                    </span><span class="pi">:</span> <span class="s2">"</span><span class="s">Your</span><span class="nv"> </span><span class="s">Name</span><span class="nv"> </span><span class="s">/</span><span class="nv"> </span><span class="s">Site</span><span class="nv"> </span><span class="s">Title"</span>
<span class="na">title_separator          </span><span class="pi">:</span> <span class="s2">"</span><span class="s">-"</span>
<span class="na">name                     </span><span class="pi">:</span> <span class="nl">&amp;name</span> <span class="s2">"</span><span class="s">Your</span><span class="nv"> </span><span class="s">Name"</span>
<span class="na">description              </span><span class="pi">:</span> <span class="nl">&amp;description</span> <span class="s2">"</span><span class="s">Your</span><span class="nv"> </span><span class="s">Name's</span><span class="nv"> </span><span class="s">academic</span><span class="nv"> </span><span class="s">portfolio"</span>   <span class="c1"># Update this with a general description of your site, this is the default if not overridden by a page</span>
<span class="na">url                      </span><span class="pi">:</span> <span class="s">https://academicpages.github.io</span> <span class="c1"># The base hostname &amp; protocol for your site e.g. "https://[your GitHub username].github.io",</span>
                                                           <span class="c1"># or if you already have some other page hosted on Github then use "https://[your GitHub username].github.io/[Your Repo Name]"</span>
<span class="na">baseurl                  </span><span class="pi">:</span> <span class="s2">"</span><span class="s">"</span> <span class="c1"># the subpath of your site, e.g. "/blog"</span>
<span class="na">repository               </span><span class="pi">:</span> <span class="s2">"</span><span class="s">academicpages/academicpages.github.io"</span>
</code></pre></div></div>

<p>Make sure you update the title, name, description, url, and repository for your website.</p>

<p>Repository is the path to the repository from your GitHub account, which should be <strong>&lt;your_github_username&gt;/&lt;your_github_username&gt;.github.io</strong></p>

<h3 id="modify-author-information">Modify Author Information</h3>
<p>In order to change the profile picture, first you need to upload a headshot of yourself into the <code class="language-plaintext highlighter-rouge">images/</code> folder for the repository. You can do this on the GitHub website by clicking on the <code class="language-plaintext highlighter-rouge">images/</code> folder and clicking Add File in the top right corner, or by locally adding a file and pushing it to GitHub.</p>

<p>Replace <code class="language-plaintext highlighter-rouge">profile.png</code> with the name of your image file.</p>

<div class="language-yml highlighter-rouge"><div class="highlight"><pre class="highlight"><code>  <span class="c1"># Biographic information</span>
  <span class="na">avatar           </span><span class="pi">:</span> <span class="s2">"</span><span class="s">profile.png"</span>
  <span class="na">name             </span><span class="pi">:</span> <span class="s2">"</span><span class="s">Your</span><span class="nv"> </span><span class="s">Sidebar</span><span class="nv"> </span><span class="s">Name"</span>
  <span class="na">pronouns         </span><span class="pi">:</span> <span class="c1"># example: "she/her"  </span>
  <span class="na">bio              </span><span class="pi">:</span> <span class="s2">"</span><span class="s">Short</span><span class="nv"> </span><span class="s">biography</span><span class="nv"> </span><span class="s">for</span><span class="nv"> </span><span class="s">the</span><span class="nv"> </span><span class="s">left-hand</span><span class="nv"> </span><span class="s">sidebar"</span>
  <span class="na">location         </span><span class="pi">:</span> <span class="s2">"</span><span class="s">Earth"</span>
  <span class="na">employer         </span><span class="pi">:</span> <span class="s2">"</span><span class="s">Red</span><span class="nv"> </span><span class="s">Brick</span><span class="nv"> </span><span class="s">University"</span>
  <span class="na">uri              </span><span class="pi">:</span> <span class="c1"># URL</span>
  <span class="na">email            </span><span class="pi">:</span> <span class="s2">"</span><span class="s">none@example.org"</span> 
</code></pre></div></div>

<p>Also, make sure you modify name, bio, location and employer. If you don’t want a certain category shown on the sidebar, you can comment it out by putting a # in front of the corresponding line (as shown in the image for pronouns and URI)</p>

<p>If you keep scrolling down the <code class="language-plaintext highlighter-rouge">_config.yml</code> file, you can add your usernames for different academic websites, software development websites, and social media. All of these will appear on the sidebar after you add them.</p>

<h2 id="step-3-deploy-your-website">Step 3: Deploy Your Website</h2>
<p>Next, you will need publish your website online using GitHub Pages. Starting from your repository page, click on the settings tab.</p>

<p><img src="/images/settings.png" alt="Settings Tab" /></p>

<p>From the sidebar, click on the Pages tab.</p>

<p><img src="/images/pages.png" alt="Pages Tab" /></p>

<p>Under <strong>Build and Deployment</strong>, choose “Deploy from a Branch” as your Source, and the master branch as your Branch. Click to Save.</p>

<p>It may take a few minutes, but now when you visit <strong>&lt;your_ github_username&gt;.github.io</strong>, the website should be live!</p>

<p>At this point, the sidebar should be filled out to your liking, and the sidebar should stay the same when you click between different pages on the website.</p>

<h2 id="step-4-edit-your-home-page">Step 4: Edit Your Home Page</h2>
<p>In order to edit your website’s home page, you will need to edit the <code class="language-plaintext highlighter-rouge">about.md</code> file, which is in the <code class="language-plaintext highlighter-rouge">_pages/</code> folder. (The <code class="language-plaintext highlighter-rouge">.md</code> file extension means Markdown).</p>

<p>You can change the title of the website’s home page by modifying the <code class="language-plaintext highlighter-rouge">title</code> at the top. All of the content on the home page is written using Markdown, so you can add headers, plain text, images, links, to your liking!</p>

<h2 id="step-5-add-or-remove-pages-from-the-navigation-menu">Step 5: Add or Remove Pages from the Navigation Menu</h2>
<p>You might have noticed that the navigation menu by default contains the following webpages: Publications, Talks, Teaching, Portfolio, Blog Posts, CV, Guide. You may not want all of these pages on your website, or you might want to add new pages.</p>

<h3 id="removing-pages-from-the-navigation-menu">Removing Pages from the Navigation Menu</h3>

<p>To remove pages from the navigation menu, you can delete or comment out pages from the <code class="language-plaintext highlighter-rouge">navigation.yml</code> file, which lives in the <code class="language-plaintext highlighter-rouge">_data/</code> folder. Note that if you comment out or delete a page from the navigation menu, <strong>this will not fully remove the page from your website</strong>, it only removes the webpage from the navigation menu.</p>

<p>You can see this if you click on the sitemap in the footer of the website — all of the website pages are listed, regardless if they are in the Navigation menu. You can remove the Sitemap <a href="https://github.com/academicpages/academicpages.github.io/wiki/Customizing-the-layout-of-your-site#removing-the-sitemap">here</a>.</p>

<p><img src="/images/footer.png" alt="Site map" /></p>

<h3 id="adding-new-pages-to-the-navigation-menu">Adding New Pages to the Navigation Menu</h3>

<p>To add a new page to the navigation menu, first you’ll need to create a new Markdown (<code class="language-plaintext highlighter-rouge">.md</code>) file in the <code class="language-plaintext highlighter-rouge">pages/</code> folder.</p>

<p>At the top of your Markdown file, add a YAML header like this one:</p>

<div class="language-yml highlighter-rouge"><div class="highlight"><pre class="highlight"><code><span class="nn">---</span>
<span class="na">permalink</span><span class="pi">:</span> <span class="s">/my-new-page/</span>
<span class="na">title</span><span class="pi">:</span> <span class="s2">"</span><span class="s">This</span><span class="nv"> </span><span class="s">is</span><span class="nv"> </span><span class="s">my</span><span class="nv"> </span><span class="s">new</span><span class="nv"> </span><span class="s">page"</span>
<span class="na">author_profile</span><span class="pi">:</span> <span class="no">true</span>
<span class="nn">---</span>
</code></pre></div></div>
<p>Note the permalink — this is how you direct the navigation menu to specific pages on the website.</p>

<p>If you return to the <code class="language-plaintext highlighter-rouge">navigation.yml</code>, file, you can now add your new page, where the url is the permalink you just created.</p>

<div class="language-yml highlighter-rouge"><div class="highlight"><pre class="highlight"><code><span class="pi">-</span> <span class="na">title</span><span class="pi">:</span> <span class="s2">"</span><span class="s">My</span><span class="nv"> </span><span class="s">New</span><span class="nv"> </span><span class="s">Page"</span>
  <span class="na">url</span><span class="pi">:</span> <span class="s">/my-new-page/</span>
</code></pre></div></div>

<p>You can now modify the page as desired, and after pushing your changes to GitHub, you should see the new page in the menu bar.</p>

<h2 id="step-6-add-your-cv">Step 6: Add Your CV</h2>

<p>Instead of using the default CV page formatted with Markdown, I wanted to add a CV pdf that I already had on hand to my website.</p>

<p>To do this, I first uploaded my CV into the <code class="language-plaintext highlighter-rouge">files/</code> directory. Then, I deleted the original Markdown content from the <code class="language-plaintext highlighter-rouge">cv.md</code> page, and added a redirect to the YAML header.</p>

<div class="language-yml highlighter-rouge"><div class="highlight"><pre class="highlight"><code><span class="nn">---</span>
<span class="na">layout</span><span class="pi">:</span> <span class="s">archive</span>
<span class="na">title</span><span class="pi">:</span> <span class="s2">"</span><span class="s">CV"</span>
<span class="na">permalink</span><span class="pi">:</span> <span class="s">/cv/</span>
<span class="na">author_profile</span><span class="pi">:</span> <span class="no">true</span>
<span class="na">redirect_from</span><span class="pi">:</span>
  <span class="pi">-</span> <span class="s">/resume</span>
<span class="na">redirect_to</span><span class="pi">:</span> <span class="s">/files/myCV.pdf</span> <span class="c1"># This is the redirect to my CV file</span>
<span class="nn">---</span>
</code></pre></div></div>

<p>This ensures that when a user clicks on the CV tab, they will be taken to your CV file instead of a Markdown CV.</p>

<h2 id="bonus-previewing-your-website">BONUS: Previewing Your Website</h2>
<p>As you are adding and updating pages to your website, you may want to run the website locally on your computer, as every commit you push to GitHub means that those changes are visible to the public.</p>

<p>To do this, you’ll have to install some software to your computer, namely</p>
<ul>
  <li>Homebrew</li>
  <li>Ruby</li>
  <li>Bundler</li>
</ul>

<p>I would recommend following <a href="https://jayrobwilliams.com/posts/2020/06/academic-website/">Rob Williams’ tutorial</a> (look for the section on previewing your website) for more details!</p>

<p><strong>Note</strong>: I ran into a dependency error after following Williams’ tutorial where I needed to upgrade my ruby version from the native MacOS 2.6.x version. After doing that, my ruby was version 4.0.5, however that <em>also</em> caused dependency version issues. If you’re running into a similar problem, try downgrading your ruby version so it is in between the two versions (mine is 3.1.6).</p>

<h2 id="read-more">Read More</h2>
<p>Congratulations! At the end of this tutorial, you should have a <em>live academic website</em> with a homepage and CV and even some additional tabs in the navigation menu.</p>

<ul>
  <li>Now that the foundation of your website is set up, I highly recommend checking out the <a href="https://github.com/academicpages/academicpages.github.io/wiki">Academic Pages wiki</a> for more information.</li>
  <li>I would also recommend checking out Rob Williams’ tutorials on <a href="https://jayrobwilliams.com/posts/2020/06/academic-website/">building an academic website</a>, <a href="https://jayrobwilliams.com/posts/2020/07/customizing-website/">customizing an academic website</a>, and <a href="https://jayrobwilliams.com/posts/2020/08/website-content/">adding content to an academic website</a>.</li>
</ul>]]></content><author><name>Hannah W. Hafner</name></author><category term="tutorials" /><summary type="html"><![CDATA[Curious about how I created my personal website? It's not as difficult as it may seem. Also, it's completely free to create and host!]]></summary></entry></feed>